Making butter at home is a rewarding and surprisingly simple process that allows you to enjoy fresh, high-quality butter with minimal effort. As more people seek to understand their food’s origins and embrace traditional cooking techniques, homemade butter has become an increasingly popular culinary adventure.
Ingredients and Equipment: What You’ll Need
To start your butter-making journey, you’ll need just a few key ingredients and tools:
- Heavy cream (preferably with at least 35-40% butterfat)
- A stand mixer, hand mixer, or even a jar with a tight-fitting lid
- A fine-mesh strainer
- Cold water
- Salt (optional)
The most critical ingredient is high-quality heavy cream. While store-bought cream works perfectly, cream from local dairy farms or organic sources can provide superior flavor and richness. Pro tip: Room temperature cream (around 55-60°F) churns most effectively.
The Butter-Making Process: Step by Step
Preparing and Churning the Cream
The butter-making process transforms cream’s fat molecules through mechanical agitation. Begin by pouring your heavy cream into a mixing bowl. If using a stand mixer, use the whisk attachment and start mixing at medium speed.
Initially, the cream will transform into whipped cream. Continue mixing, and you’ll notice a dramatic change. After about 5-10 minutes, the cream will suddenly separate into solid butter and liquid buttermilk. This magical moment is when the fat globules have completely broken down and clustered together.
Separating Butter and Buttermilk
Once the butter has formed, strain the mixture through a fine-mesh strainer, capturing the solid butter and reserving the buttermilk. Pro bakers often save the buttermilk for baking recipes like pancakes or biscuits.
The next crucial step is washing the butter. Rinse the butter with cold water to remove any remaining buttermilk, which can cause the butter to spoil quickly. Gently knead the butter while rinsing to ensure thorough cleaning.
Flavoring and Storing Your Homemade Butter
Homemade butter offers incredible versatility for flavoring. Consider adding:
- Kosher or sea salt
- Fresh herbs like chives or rosemary
- Cracked black pepper
- Honey or maple syrup for a sweet variation
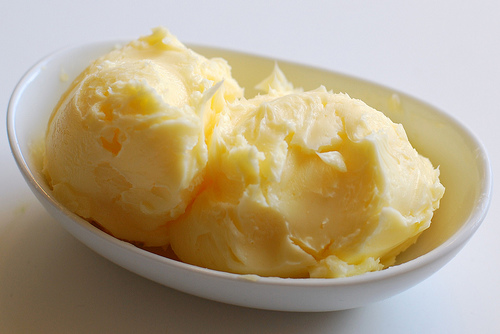
After adding your desired flavors, shape the butter using parchment paper or a butter mold. Store in an airtight container in the refrigerator, where it will keep for about 1-2 weeks.
Troubleshooting Common Butter-Making Challenges
Don’t be discouraged if your first batch isn’t perfect. Common issues include:
- Butter won’t form: Ensure cream is the right temperature and fat content
- Grainy texture: Over-churning can cause this; stop mixing once butter forms
- Quick spoilage: Thoroughly wash butter to remove buttermilk
Nutritional Benefits
Homemade butter offers several nutritional advantages over store-bought alternatives. It contains no preservatives and allows you to control ingredient quality. Butter from grass-fed cream is rich in vitamins A, D, E, and K2, and contains beneficial fatty acids.
Final Thoughts
Making butter at home is more than a cooking technique—it’s a connection to traditional food preparation methods. With practice, you’ll develop a skill that impresses friends and family while providing delicious, fresh butter for your culinary creations.
Remember, the key to great homemade butter is patience, quality ingredients, and a sense of culinary adventure. Happy churning!